Poly-Vinyl Pests!
Attention ants of the colony, we are under attack! Monsters mutated by microplastics have invaded our realm and it's up to you and your friend to defeat them! Poly-Vinyl Pests, or PVP for short, is an arcade action style game where you and your friend take the roles of the champions from competing ant colonies. Together you’ll defeat deadly decomposers and compete for glory as only one of you can declare yourselves the queen of the anthill.
Contributions
In the first half of this project I was tasked with the creation of many systems for our game to function. I mainly focused on the AI and UI of the game while still working in other areas. I helped design and implement each boss fight and all the game’s UI with our team’s designers and artists. Besides my main focus, I maintained the codebase for our local multiplayer, narrative, and player systems. My main goal in the first half of this project was to get a minimum viable product working for the end of the semester, but also create a polished product. This project, if our team got through greenlight, would get another semester of development in the spring semester, so showing a core game loop with a lot of polish was the main priority.
Watch our greenlight presentation here!
After our team was greenlit to continue into the spring semester, I started work as the lead programmer and helped onboarded our 6 new members which brought our team size to 15. Since our team was so big and we had recruited another producer, we decided to split the team into two scrum teams that would each work on two of the biggest parts of our game. The first team was in charge of creating a new boss and the second was in charge of implementing an upgrade system that would change how the entire game was played. Our second producer and I led the upgrades team in creating the new system. As the lead programmer I didn’t limit myself to just working in one scrum team since I also helped onboard new members that were on both teams in addition to still helping with polishing the new and old bosses.
Watch our senior show presentation here!
What is Poly-Vinly Pests!
In Poly-Vinyl Pests you and one of your friends take the role as champions of warring ant colonies. You and your friend are tasked with defeating different boss monsters that have fused with various pieces of trash and now use it to their benefit. These monsters are known as decomposers and have the unique ability to break down the plastics that we humans littered throughout the earth. To fight these monsters you must put aside your differences and work together to defeat the bosses, but after the fight is over you will begin pvp combat with your former ally. Along the way you and your friend will connect upgrades that will strengthen your ants in PvP and PvE fights. At the end of the game the winner is determined by the amount of score each player has. Players can gain score by hitting bosses and the other player.

Bullet Hell
Poly-Vinyl Pests takes heavy inspiration from bullet hell games, so a robust bullet hell system was mandatory. I collaborated with one of our system designers to design and implement a bullet hell system that all current and future bosses could use. The bullet hell system uses an object pool to store all gameobjects for efficiency and will spawn them with custom rotation and direction based on the pattern. Using this system our team was able to easily implement new attack patterns in a short amount of time.

Boss AI
When we were in the early stages of development I needed to quickly create a boss AI that was able to switch between two targets. I wanted to create the boss systems to be accessible to all disciples that would need to work with it so I decided to utilize Unity’s animator as the state machine for the boss. After a lot of experimentation I was able to get the state machine working with easily accessible values to change things about the boss. Another benefit of using the unity animator was that our team’s animator could easily add animations into the boss without having to ask someone else to do it and bottleneck our art pipeline.
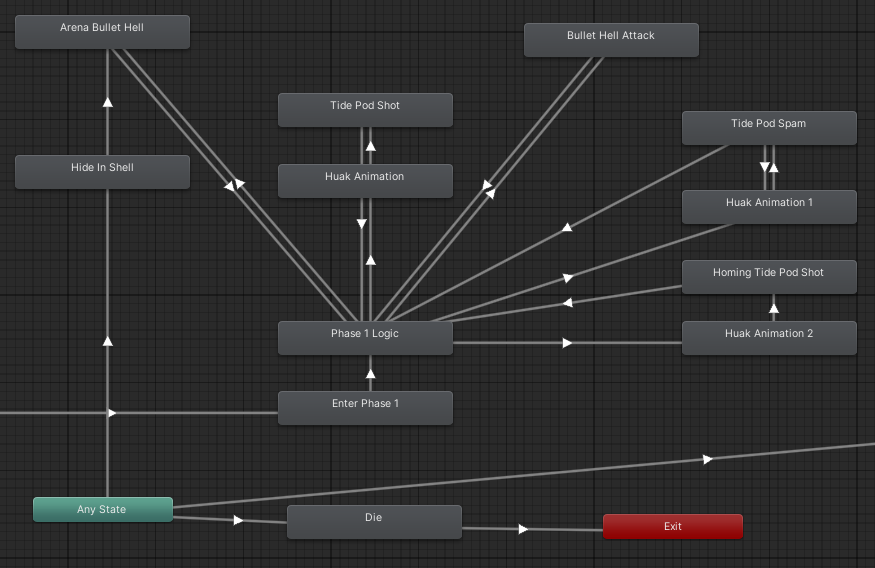
There was definitely some getting used to working with the animator, but after a few weeks of development the entire team was glad to be able to utilize a feature that was built into the engine and have very accessible systems. The way the boss AI is implemented would allow designers and artists with less programming knowledge to easily work with the AI.
The way the AI works is in a state that determines which attack it will perform based on the game state, then moves to that state. After the attack is done it will move back to the attack decider state and repeat this loop until the boss is dead. This simple implementation allows for a rapid iteration which was necessary due to the amount of balancing and testing we had to do for each boss fight.
Bosses
We were able to implement three unique and fun bosses into Poly-Vinyl Pests! The first one is the Laundry Snail, a slug that makes a laundry detergent bottle its shell and shoots poisonous laundry detergent and (non-branded) tide pods at the players. The Laundry Snail has very straight forward attacks as it is the first boss in Poly-Vinyl Pests! The boss will hide in its shell when it takes too much damage and start the laundry machines in the environment to spawn hazards for the players. When the players do enough damage to the boss it will transition into the second phase, the Laundry Slug, and lose its shell and charge at the players. In this phase the boss is more aggressive and will move around the arena.
Our second boss is the bottle mushrooms, a hivemind of mushrooms that took residence in plastic water bottles that shoot spores at the players. Alone each mushroom isn’t very strong, but when they all work together it can be very challenging to avoid all of their attacks. Each mushroom shares the same moveset so alone they are easy to deal with, but as the fight goes on more and more mushrooms will spawn until the players are facing three bosses at once. The mushrooms each have multiple bullet hell attack patterns, a spore attack that will stay in place and block the area, and a shockwave attack if players get too close.
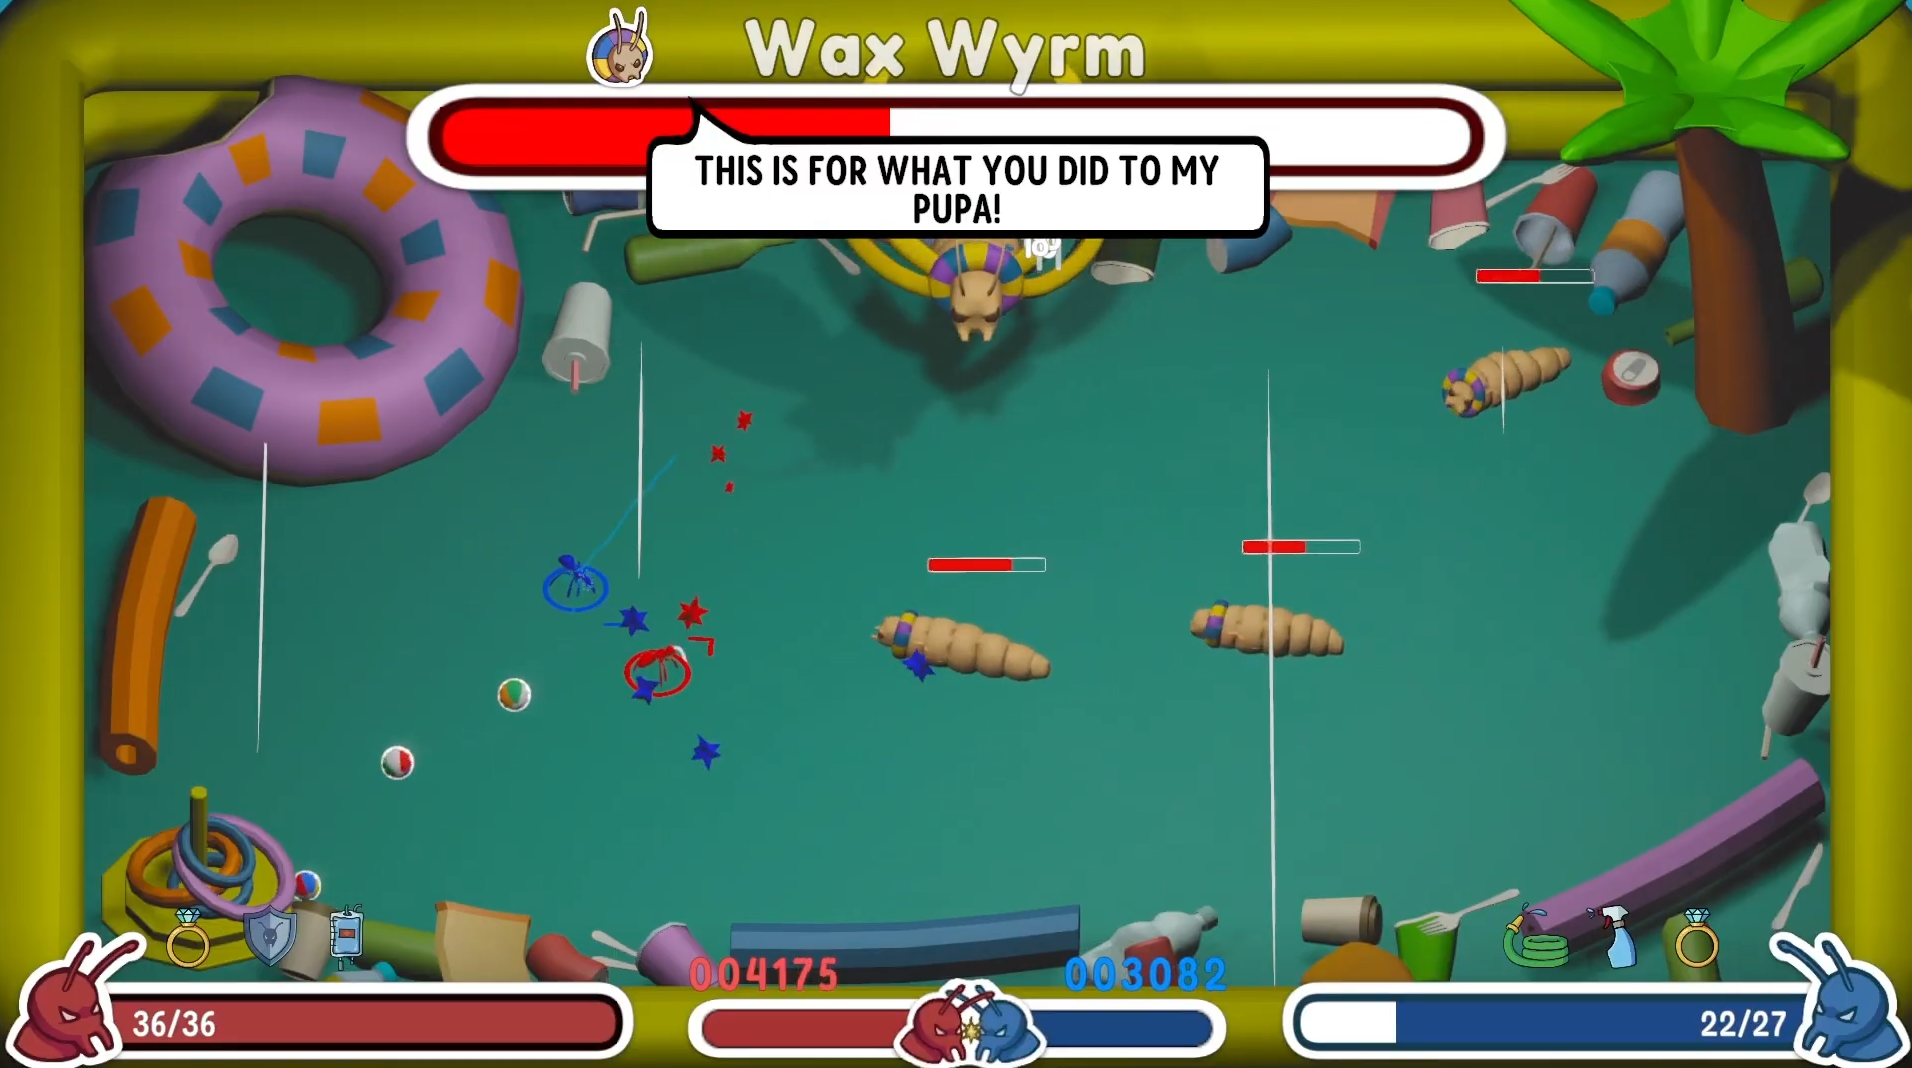
Our third boss is the Wax Wyrm, based off of the wax worm and wax moth. The Wax Wyrm starts the fight as the Wax Larvae with 4 smaller enemies fighting the players, but when the players defeat all but one of the larvae the final larvae will transform into the Wax Wyrm and start the second phase. In the second phase the Wax Wyrm acts as more of a support to the Wax Larvae it spawns in. The Wax Wyrm primarily focuses on disrupting the player’s movement while the larvae shoot and roll at the players.
Boss Challenges
When designing our first boss we had a lot of time left in the semester to work, but when we wanted to add a second one that was when we had to start really thinking about how much time we had left. The way we designed the second boss made use of existing systems to create a unique boss fight without the creation of new massive systems to save time and energy. We made sure to reuse the bullet hell system and designed the second boss to require little to no animations but still feel alive. Our final product was the bottle mushrooms, a hivemind boss that would spawn mushroom enemies that did not move around the arena. This design took care of most of the risks involving implementing a second boss in such a short amount of time.
When we entered the second semester of development our team decided that we wanted to only add one more boss and focus on polishing the other two. We focused on quality over quantity to help engage players in each boss fight. In the second semester of development we added the Wax Wyrm which was a significant challenge to many players and took an entire semester of balancing to get right. In addition to adding upgrades which changed how players could approach bosses, it was a lot of work to balance everything, but with the addition of new teammates we were able to pull through and get everything in. One of the biggest challenges for the Wax Wyrm was getting everyone on the same page right after onboarding new members. We had issues at the beginning trying to get everyone’s input and ideas in. In the end splitting the team into two scrum teams helped a lot with the massive amount of ideas and input we were getting.
Score System
To determine which player is the Poly-Vinyl Best at the end of the game we needed to keep some kind of score. Our team decided on an arcade style of score which would increase whenever a player hit a boss or another player. Players cannot shoot their “teammate” during boss fights, but can during the pvp sections of the game. The score is always displayed on the screen and a final score will be shown at the end of the game. Players will also lose score when they die during a boss fight. If you win a pvp combat round then you will be awarded with a large amount of points. We did this to prevent one player that got ahead in the PvE round running away with the game.

Pvp
The other part of Poly-Vinyl Pests is the pvp combat. To make this combat feel more interesting, our team designed and implemented two different arenas with separate environmental mechanics to make combat more dynamic. I implemented both of these arenas with the help of our designers and artists to make sure we stayed on theme.
The first arena was the pvp combat after the laundry snail. To help us make the art scope smaller we used the same environmental assets as the laundry snail’s arena with a few new props added in for the arena’s mechanic. The mechanic of this stage is the sludge that spawns in the four corners and will slowly encroach until the arena is almost completely covered. Walking into this sludge will deal damage to the players and forces the players to get closer to each other. Another mechanic is the red solo cups that players can dash through.
The second arena is after the bottle mushroom fight. Using the same tactic in reusing the boss’s arena assets, we were able to quickly create an arena for the players to fight in. The mechanic of this arena is the destructible trash bags that are scattered throughout the arena. The players can shoot them to destroy them after a varying amount of damage. After a certain duration the trash bags will respawn and drop down onto the map. If a player is standing under a falling trash bag they will be killed in one shot.
The third arena is after the wax wyrm fight and takes place in the same arena. The arena is mostly empty but will periodically spawn in indescribable bouncing larvae that will spawn shockwaves for the player to dodge. This arena has the least walls and it is mostly up to player skill. There can be a max of two bouncing larvae in the arena to not make the fight be too cluttered. We reused the bouncing larvae from the wax wyrm fight as a hazard to save the artists time and resources so we could focus on more polish.
The final PvP arena is the finale and takes place right after the third PvP fight. In this arena each player has 3 anthills with shields protecting them. The anthills allow the players to respawn after being killed but only if the player has at least one anthill alive. When a player is killed their anthill’s shields go down and are vulnerable. To get your shields back up you need to kill the other player. This arena is the finale of Poly-Vinyl Pests and serves as the final test against your foe. This fight is usually very chaotic with players respawning multiple times and each player being very strong with 4 different upgrades.

Upgrade System
In the second half of development for Poly-Vinyl Pests our team wanted to add in an upgrade system for the players to progressively get stronger throughout the game. The beginning of this development cycle included the introduction of 6 new developers on our team with two of them being designers. Our team, being composed of 15 developers, decided to split the team into two scrum teams one for boss fights and one for upgrades. I was the lead for the upgrades team so I helped our scrum team’s producer manage 4 designers and 2 artists to implement the base upgrade system.
Initial Design
First we started with brainstorming how we wanted our system to work. I suggested we create a base upgrade class and apply it to the players to add passive or active effects. I wanted to keep all the upgrade code self contained in their own scripts so having a base class we could abstract from would achieve this goal. My goal in the first sprint was to get a working system with passive and active upgrades that changed the player’s stats in some way.
After a week I was able to get an upgrade system with rerolls, rarities, basic stat upgrades, and active effects. The cards were taking in data from prefabs that each had their own script that derived from a base class.
The base class contained all the data required for an upgrade to be made and could be set in editor. I wanted the process for creating upgrades to be as straightforward as possible so our designers could easily implement upgrades in engine.
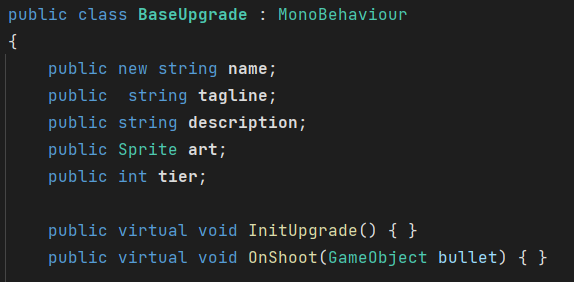
In the image above there is the “OnShoot” function which will be called each time the player shoots. Similar functions are in the base upgrade abstract class and will be called in the player script instead of the upgrade script itself. This helped keep the upgrade code separate from the player script and kept clutter to a minimum.
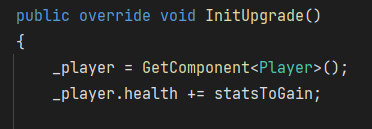
Some of the upgrades may need a reference to something, usually the player its being attached to, at least once. To implement this I created a “InitUpgrade” function that is called when the upgrade is instantiated in the scene and placed on the player. This function will get references to anything it needs to and is where you can add stats to the player. In this example below is getting a reference to the player and giving them stats.
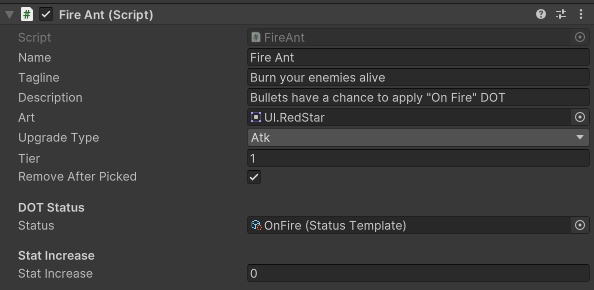
To make an upgrade in engine you would just need to make a new script that inherited from the base upgrade class and put it on a prefab. Then you could drag the prefab into the “UpgradeManager” list for upgrades and the system will handle the rest. In the separate upgrade script you could add any effect you wanted and it would be applied to the player when the player picked it in the upgrade selection scene.
Implementing Upgrades
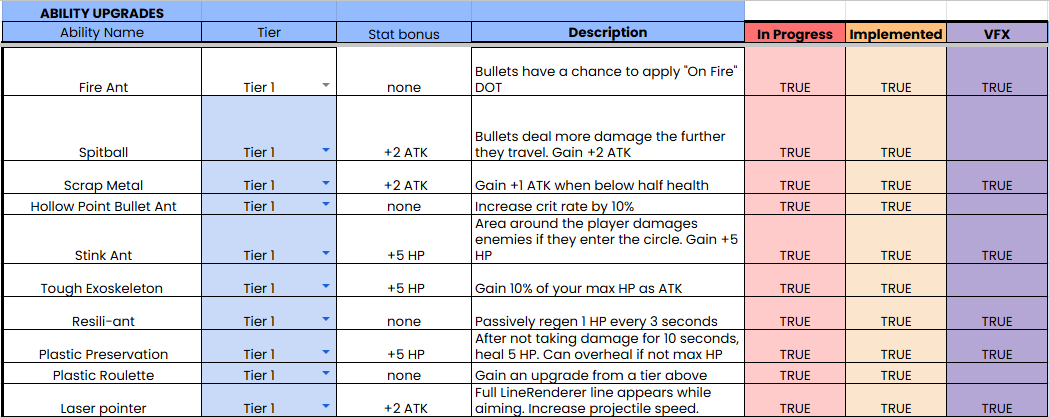
After the base system was implemented our team could get to work on implementing upgrades. I created a spreadsheet for us to brainstorm upgrade ideas and took our favorites to start implementing. Initially we started by separating each upgrade into different types such as attack, defence, and utility, but this limited our creativity and we decided to scrap it. In the end we went with a tier system that would have the weaker upgrades we lower tier and the game changing ones be higher tier. The tier you could see would depend on how many bosses you have defeated.
I’ll show two examples of upgrade implementations: a passive stat upgrade and an active one that requires some condition to be true of the upgrade to buff the player.
The first one will be the passive stats one. Let’s take a look at the “Hollow Point Bullet Ant” upgrade. It only increases the player’s crit rate by 10%, so in the “InitUpgrade” function we just need to get a reference to the player and add the stat. This is what that function looks like in that upgrade.

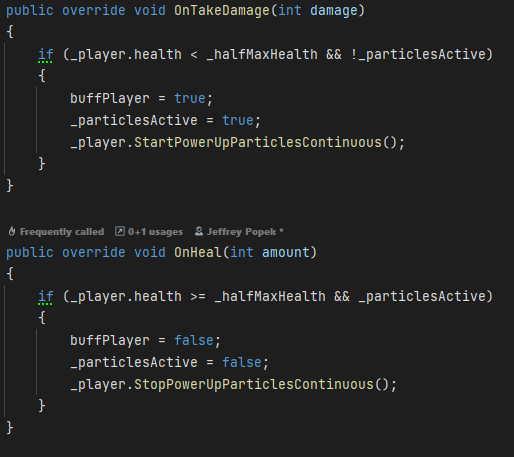
For the active upgrade we’ll look at a simple one: “Scrap Metal”. Scrap metal only applies the buff when the player is below half health, so we need to check the player’s health. Initially you might want to check it in an update function but we can make it more efficient by only checking it when the player takes damage. You can see we also check if the buff should be active when the player is healed. These functions are ones that are called in the player script when certain actions are called if an upgrade they have has one of those functions.
Status Effects
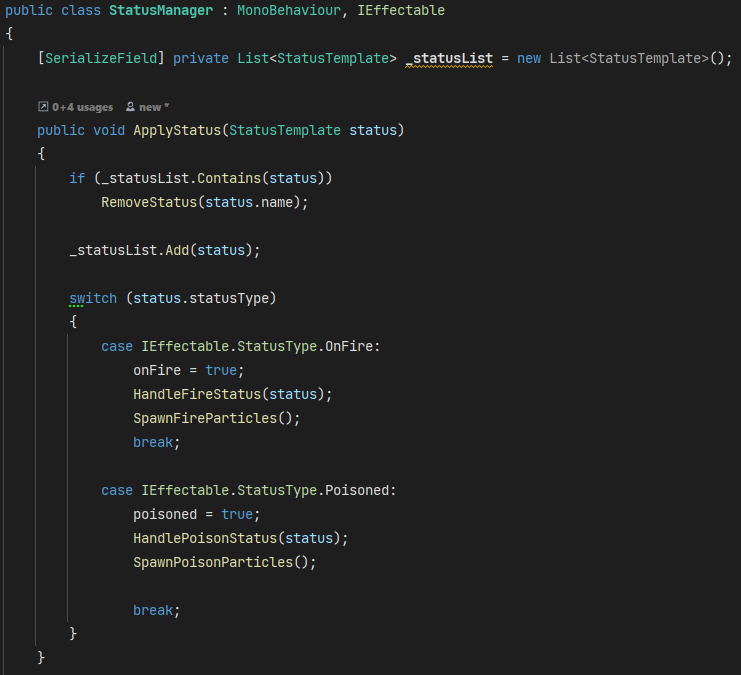
One type of upgrade many people on our team really wanted were status effects. I worked on creating a status effect manager that would allow every character in the game to be affected. First I created a status manager script that would be applied to each boss, enemy, and player. Then I made a list that allowed each character to have a status applied to them.
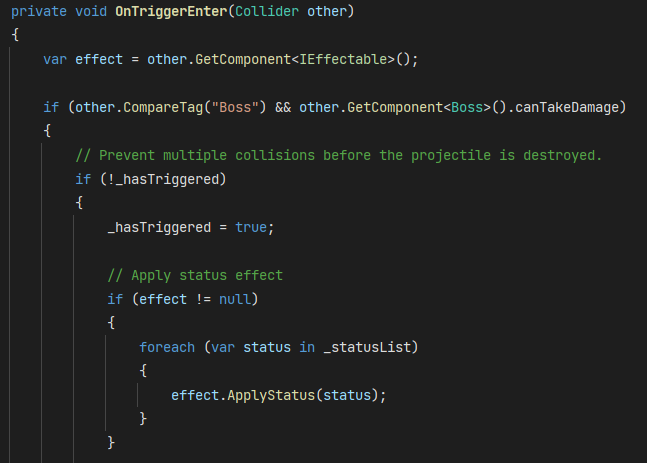
The “ApplyStatus” function is called when a projectile with a status effect attached to it collides with a character. The example below is the boss’s collision logic when it collides with a projectile with a status effect applied on it.
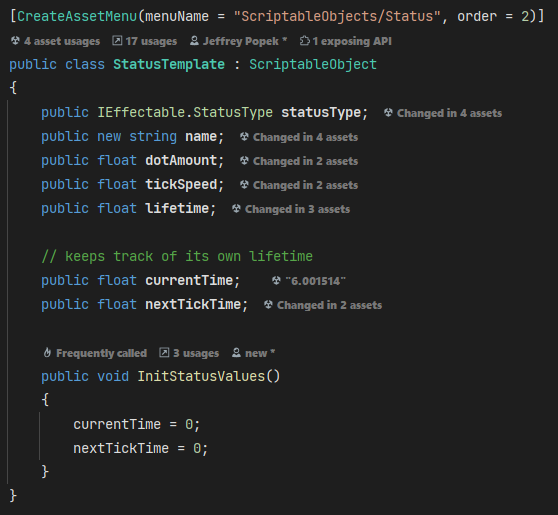
Each status effect is a scriptable object with the data needed to apply the status effect. For example you would need the duration, damage, tick speed, and name. Each status can be created in the editor and the rest of the work will be done in the status manager.
In the status manager it will take this info for a status and apply the correct status effect. In the example below we are looking at the “HandleFireStatus” function which as the name explains handles the on fire status effect. If you wanted to add a new status into the game you would need to create a new function to handle the status and add whatever logic you wanted that status to do there.

UI Implementation
One of my favorite parts of game dev is designing and implementing UI. That is why I was more than happy to take on the role to implement our game’s UI. I worked with multiple designers to create UI for the different parts of our game which includes but not limited to: narrative systems, boss UI, player UI, end result screens, upgrade UI, and more.
Upgrades
One of the new big systems in our second semester of development was upgrades. Upgrades would play a big role in the game and would need to be shown at almost all points of the game. I worked with our UI designer to design the upgrade selection UI along with showing upgrades in the pause menu for easy access during gameplay.
The upgrade selection UI was the most important part of the implementation. I created a system that checked for the winner of the last PvE round to pick their upgrades first. An upgrade sequence will let the winning player pick first, then the other player, then finally show the upgrades that both players have. Players can view their upgrades until they both confirm to leave for the next scene.
The other UI that we created to show the upgrades is the pause menu. When we would test our game players would have a hard time knowing which upgrades they picked after they picked them. We remedied this by allowing players to see their upgrades at any time. When a player pauses both players can switch between their upgrades.

Another way we show what upgrades players have is displaying the upgrade icons above the health bar of each player.
Narrative
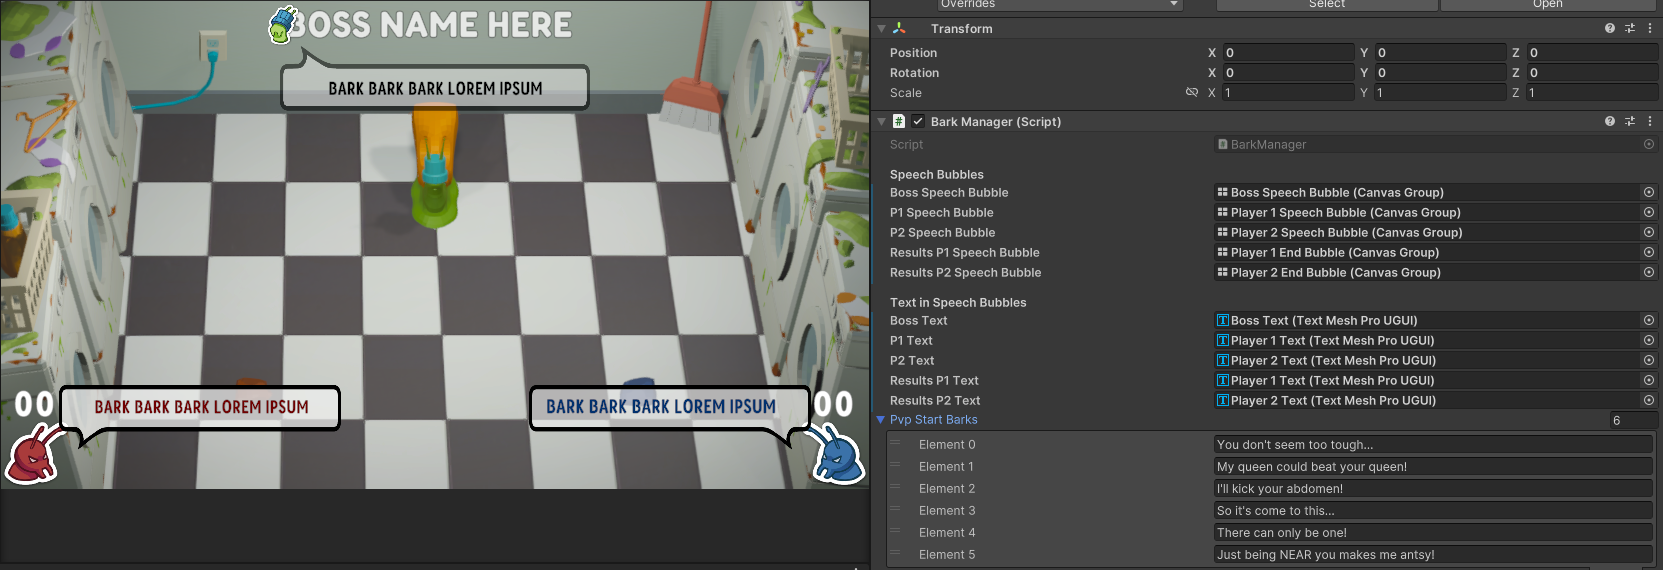
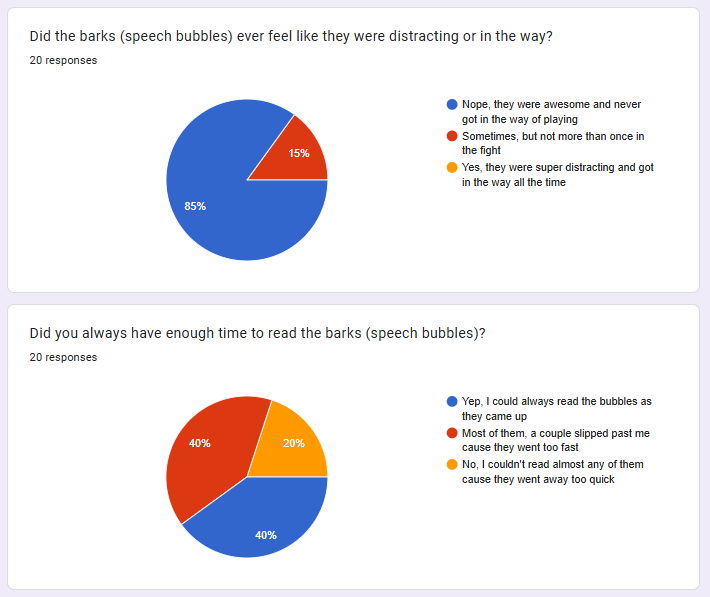
One big thing our game is currently lacking is a narrative, so our team made the decision to give the players and bosses unique barks that would play before, during, and after combat rounds. These barks are meant to give more character to each of the bosses and players. To implement the barks I would need two things, the UI itself (speech bubbles and icons) and a UI manager that could play the barks. To accomplish this I created a structure that takes in a speaker and bark that will allow our designers to easily add barks with no programming needed. This approach allowed for rapid prototyping and testing to find out which barks suited our game the best.
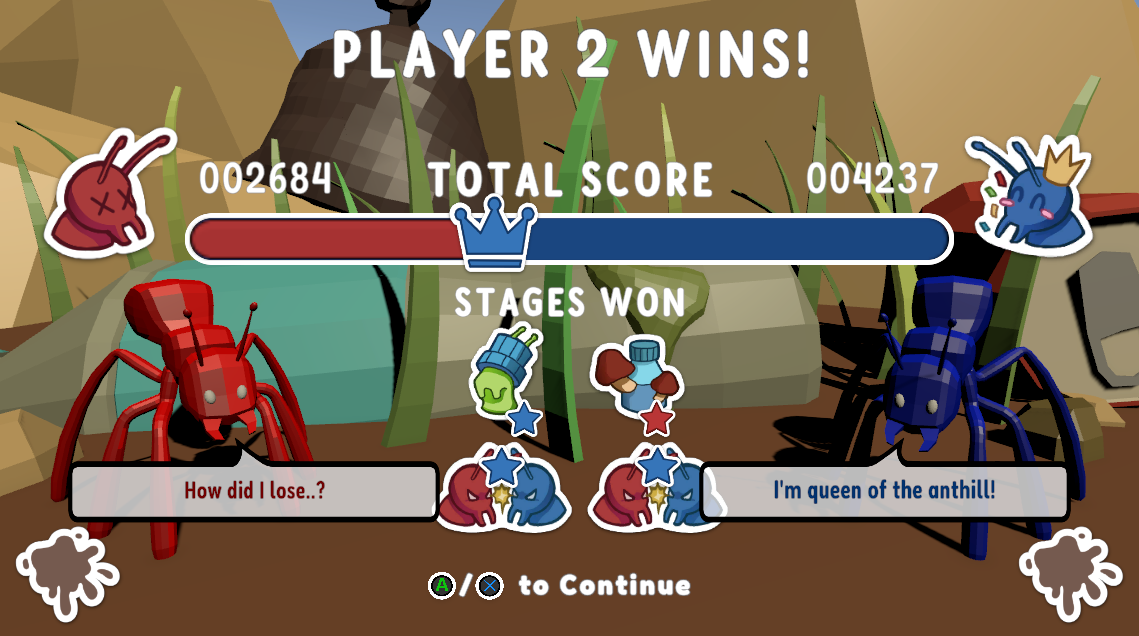
We also added small barks before each PvP fight to add more character. The ants are working together but not necessarily being friendly. This fun banter helped players become attached to our characters. The player ants will banter like this every chance they get, in the scoreboard, before fights, and even after the game ends in the final scoreboard.

Boss Fight
During an intense boss fight the last thing you want is something in the corner distracting you from the action. To combat this issue our UI designer and I were very deliberate with what information is shown during gameplay. We wanted to show the bare minimum but still convey all the information the players would need to know.
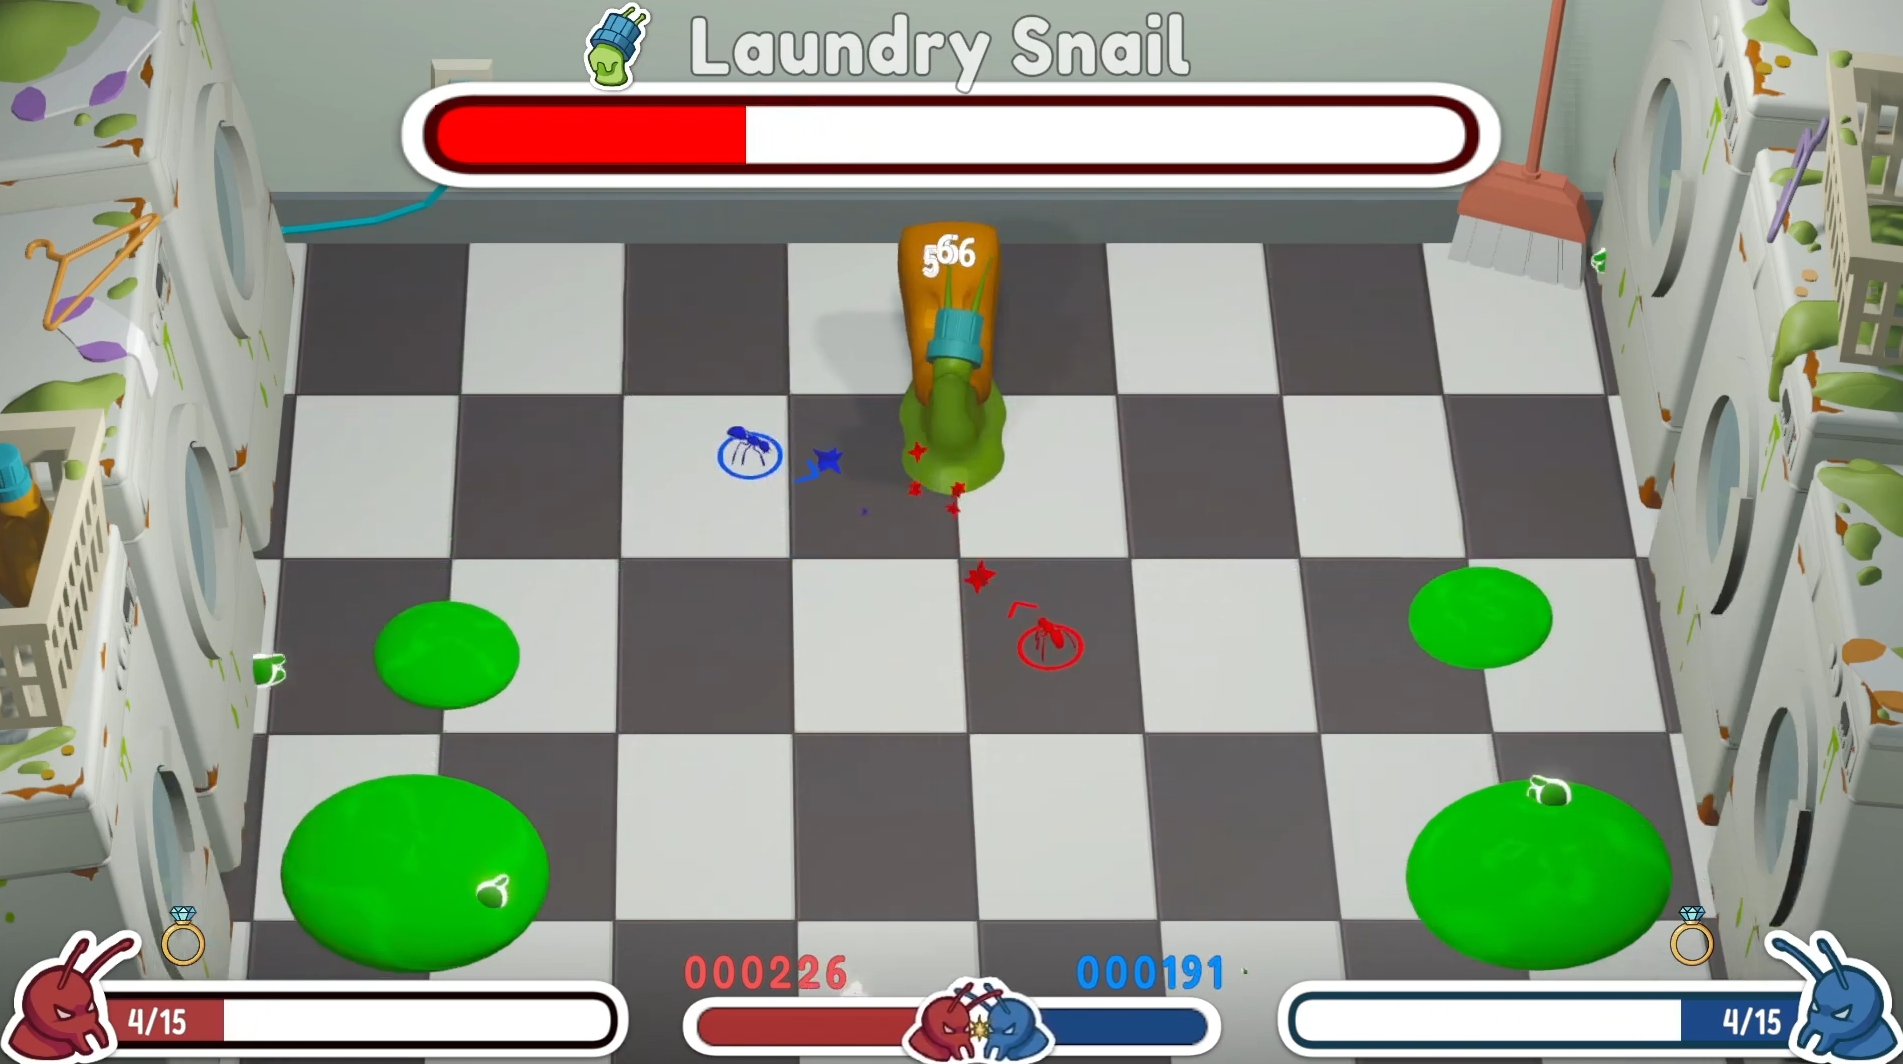
In this example the only information that is shown is the boss’s health bar and the player’s info. The player’s info contains their health and score. All this UI is updated by a boss UI manager and a player UI manager during gameplay.
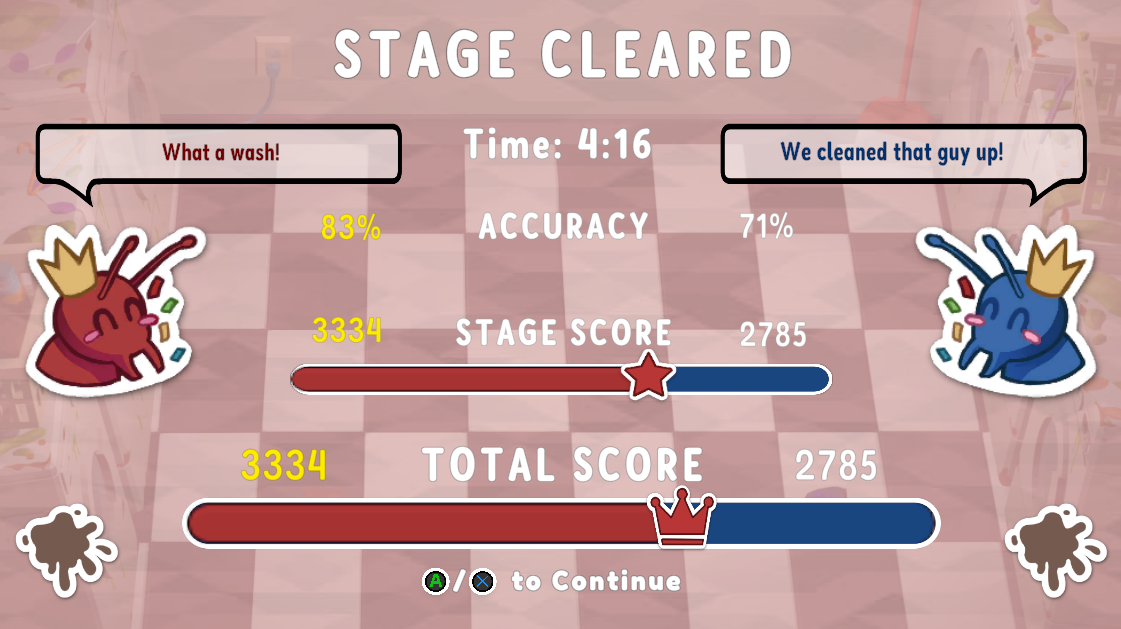
Results
To really emulate the arcade feeling in Poly-Vinyl Pests our UI designer and I created a scorescreen for the end of each Pve and Pvp round that would display who won and the total score. I spent a lot of time adding animations and transitions to these scorescreens to add polish and character to our game’s UI. We made sure to convey who was the winner of the round by adding in little character portraits of each ant in either a winning or losing state.
We also create a final score screen that will show much more information about who won each round. This final score screen is the end of the game and allows players to play again to contest the winner.
Highscores
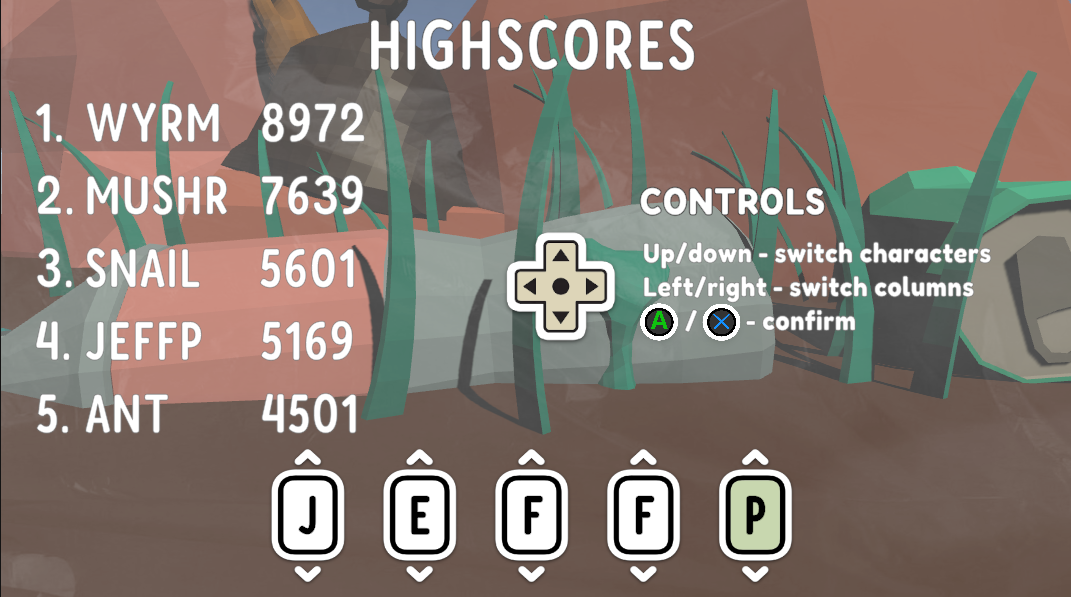
Another piece of UI I implemented was a high score screen that is right after the final score screen. The UI will allow only the winning player to enter five letters to the high score leaderboards. In the future our team wants to create an arcade cabinet for our game, so adding in leaderboards is essential for making players feel great when getting a good score.
Main Menu
The main menu of our game serves to pick a gamemode and allow for another play to join. The main menu design is simple yet straightforward. We had little issues with people not understanding how the menu worked. For our Steam release we had the player to press a button/key first be player 1. Then player 1 would control the menus until they picked a gamemode and let player 2 join. I also added a toggleable tutorial so that more experienced players could skip straight to the game.
Optimizations
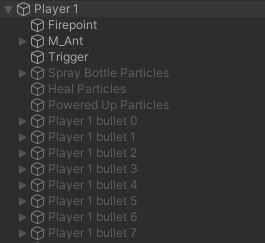
The main optimization I did for our game was to optimize all the bullets and projectiles characters would shoot. By using object pooling to reuse game objects we were able to stop instantiating new objects each time a boss or player would shoot. Another small optimization was doing the same thing for all VFX in the game. Each VFX is pre-instantiated and will only be active if necessary.
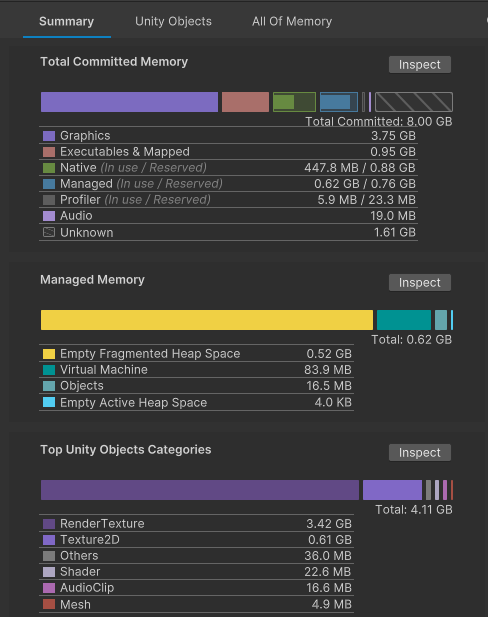
fix I did was fix our game’s cutscenes with the help of another designer. We used the Unity timeline system to create cutscenes to introduce each boss fight, but the timeline tool used a ton of memory and would crash some people’s games/editors. I utilized the Unity profiler to find out what was using so much memory and work with our designer to minimize memory usage. After those changes and adding occlusion culling our cutscenes ran much smoother and didn't crash the game.
QA Testing
Poly-Vinyl Pests is a game that requires a lot of balancing, which in turn means a whole lot of testing needs to happen. Our team knew that this game would require a lot of testing so we were able to go to the Champlain College game testing lab (GTL) each week to test out any existing or new features that week. With feedback from an outsider’s perspective we were able to change things about the game that players did and didn’t like. Our team also attended multiple smaller testing sessions that only included other students from capstone. These smaller testing sessions gave very focused and important feedback.
Finally, the most important feedback we received was from our industry review from Champlain alumni at Bungie. Having Champlain alum with experience in not only Champlain’s game studio capstone, but also in the game industry was great in terms of feedback. Our most critical and helpful feedback came from the two sessions we had with the alum.
Boss Balance
For our game, a big focus of it was the balance of the players and bosses. With external and internal testing throughout the entirety of the project we were able to balance both players and bosses to make a fair and competitive gameplay experience. I would often attend the game testing lab (GTL) sessions to watch testers play and ask questions relating to what feature we were testing that session.
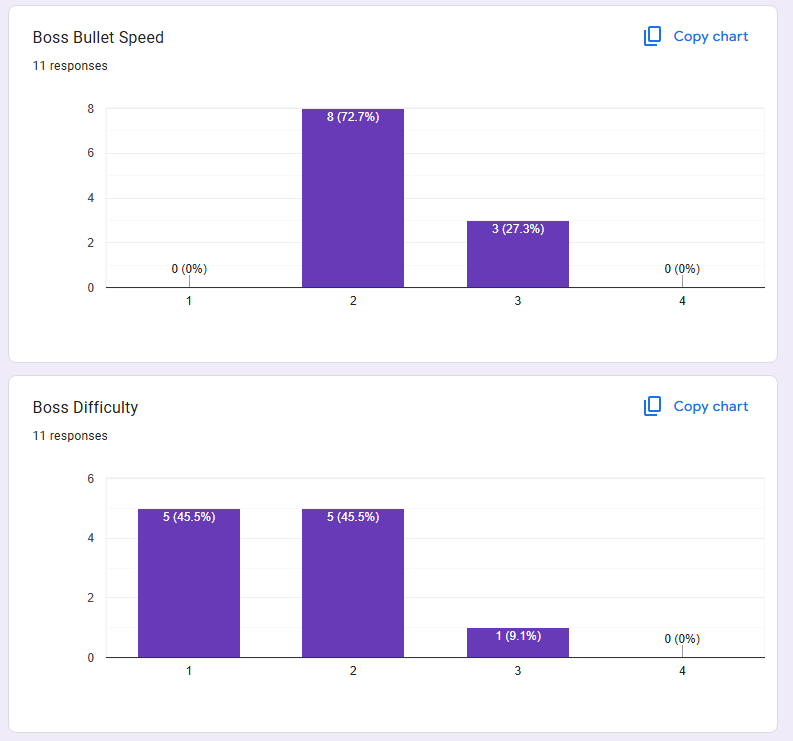
For the entirety of the project, I iterated and managed the balance of the game with the help of other designers. New attacks were developed to combat issues that players were facing. For example, we found that many players would not be moving enough during the laundry snail fight, so to combat this we implemented a homing attack that would chase the player until they shot it down.
Upgrade Balance
Adding upgrades to Poly-Vinyl Pests halfway through development was a difficult task. We already had the original two bosses’s values balanced for the players, but giving players upgrades would break all of that. For that reason I wanted to get as many upgrades in as soon as possible to test values throughout the entirety of the semester. We were successful in this goal and were able to balance, rework, add, and remove many upgrades based on feedback. One of the most important factors in helping us balance upgrades was recording each testing session and rewatching for any massive gaps in power with any of the upgrades. Using these methods we were able to mitigate a lot of the scope risks with adding a massive upgrade system.

Another factor that helped was a tool I created for tracking upgrade pick rates. I go more in depth in this blog post here , but in short it would tell us which upgrades were being picked more often than others which usually indicated that it was too strong.
Steam Release
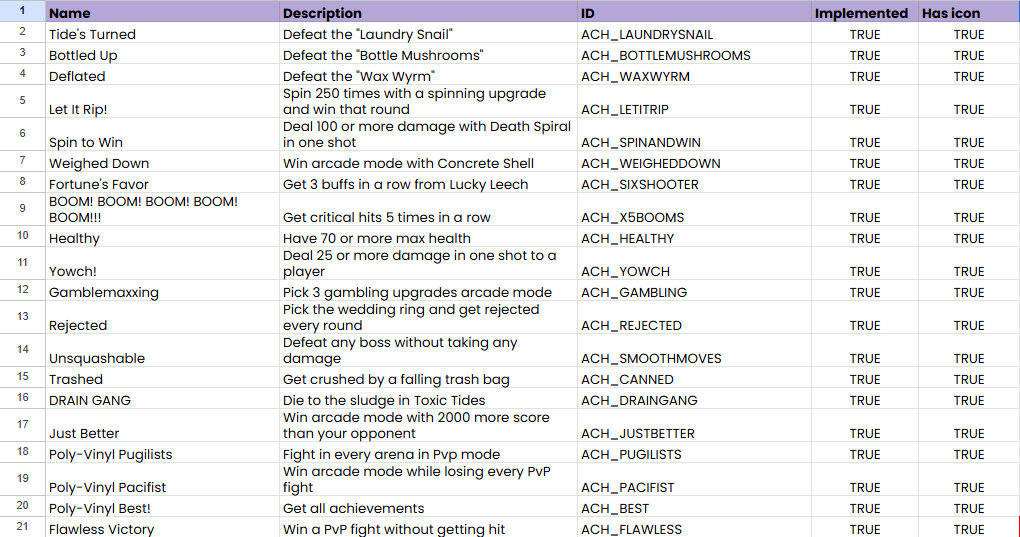
When one of our producers got the steam page setup I was in charge of managing the steam builds. I also added achievements to our game using FacePunch’s API. Through this process I got familiar with Steam’s API, uploading builds, and editing store pages.
To add achievements I utilized FacePunch’s API to call a Steam function to trigger achievements. One big bug I ran into while implementing achievements was that if you didn’t have Steam connected when you got an achievement it would break the game. This was a good lesson to learn and I added safeguards for when a player got an achievement. When implementing achievements I collaborated with designers to get 47 unique achievements in the game for its launch. I collaborated with one of our artists to reuse icons from our game with a bit of edits to save time and reduce scope with having this many achievements.
Onboarding
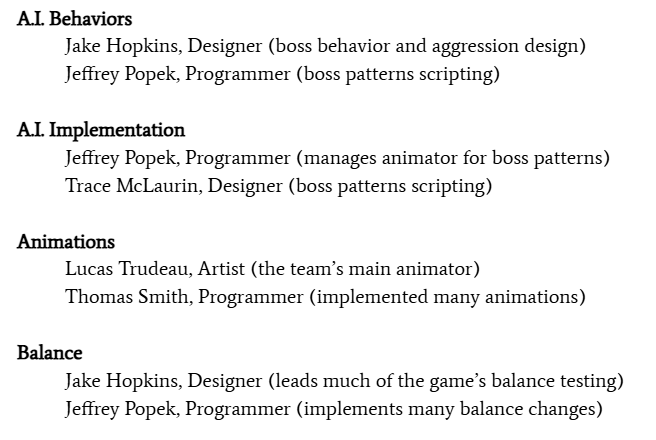
In the second semester of development our team recruited 6 new members. This is where I took a leadership role in the group on the technical side of the project. I helped the new members get into our repo, get used to documentation and coding standards. We also created documents specifically for new members to read to get used to the project. One of these documents was the “Area of Expertise” document where a new member could go to any of the listed members for help with that subject.
Although our team was technically very prepared to onboard new people, it is hard to get used to working on a brand new project just like that. Our newly expanded team had the entirety of winter break, about a month, to get used to talking to each other. What really helped our team click was doing group activities together online over break such as playing games or watching movies. I feel that this was the most important part of onboarding since a team where no one is having fun is not going to be as productive.
We played a lot of webfishing :)
Documentation
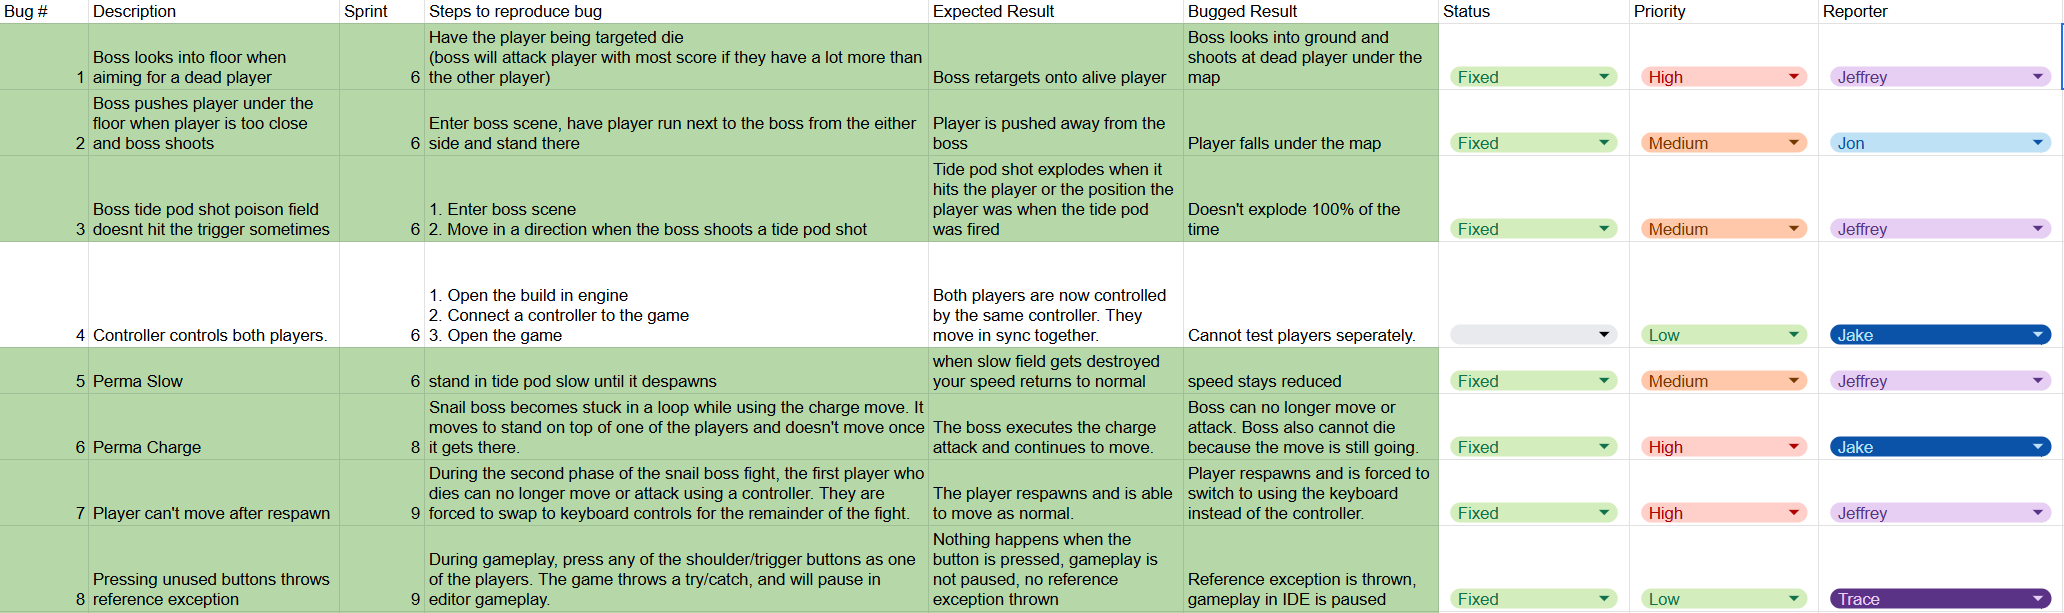
As the lead programmer of this project I was in charge of all the programmer documentation. There was only one required document to make, but I created other various documents to help with organization and bug fixing. One of the most important documents in the entire project is the technical plan document. This document is what we would give someone if they were being onboarded onto the project. This document must contain pipelines for implementation of all disciples, all the systems currently in the game, and many more things. I maintained this document throughout the entire project; updating it whenever a new feature was added or an old one was changed.
Technical Plan DocumentAnother example of one of these documents is the bug report form. I created a sheet that allowed our game to input the bugs they find during testing for someone to later fix.